
.svg)


.svg)

This guide explains how to install the Cywift Platform, and covers initial configuration of the appliance
Install Cywift Appliance OVF:
Use the New Virtual Machine wizard to deploy virtual machines from OVF and VMDK files, or from OVA files.OVA deployment is limited to files under 1 GB in size due to Web browser limitations. To deploy an OVA file greater than 1 GB, extract the OVA file using tar and provide the OVF and VMDK files separately.
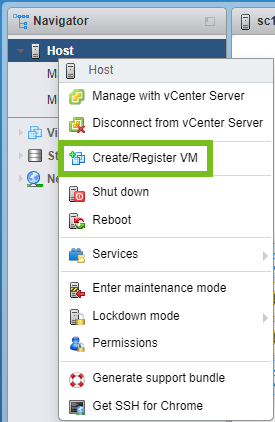
1. Right-click Host in the VMware Host Client inventory and select Create/Register VM.
2. On the Select creation type page, select Deploy a virtual machine from an OVF or OVA file and click Next.
3. On the Select OVF and VMDK files page, provide a unique name for the virtual machine.
4. To select an OVF and VMDK, or an OVA file to deploy, click the blue pane.Your local system storage opens.
5. Select the file that you want to deploy your virtual machine from and click Open.The file you selected appears in the blue pane.
6. Click Next.
7. On the Select storage page, select the storage type for the virtual machine.
- To save all the virtual machine disks and configuration files on a standard datastore, click the Standard button.
- To save the virtual machine hard disks on the host-local PMem datastore, click the Persistent Memory button.
- Select a datastore from the list and click Next.
Important:The configuration files cannot be stored on a PMem datastore. If you choose to use PMem, you must select a regular datastore for the configuration files of the virtual machine.
8. On the Deployment options page, select the network mappings, disk provisioning, and whether you want the virtual machine to power on after deployment.
9. Click Next.
10. On the Ready to complete page, review the details and click Finish.
The virtual machine appears in the VMware Host Client inventory under Virtual Machines
Assign a Static IP Address
- Locate your deployed VM.
- Right-click → Open Console or Launch Web Console.
- Login with following (default) credentials.
Username: cywift
Password: Cywift@123
- Edit network config file.
sudo nano /etc/netplan/50-cloud-init.yaml
network:
ethernets:
ens160:
addresses:
- 192.168.1.38/24
nameservers:
addresses:
- 8.8.8.8
search: []
routes:
-to: default
via: 192.168.1.101
version: 2
(replace the IP Address “192.168.1.38/24” to you desired IP and also update the gateway from “192.168.1.101” to your subnet gateway IP)
To exit the editor press CTRL+X and enter “Y” to save changes.
- Apply the IP Address changes
sudo netplan apply
- Once the IP Address is updated run following script to initialize the application
cd /home/cywift
sudo ./net_config.sh
- On the prompt choose between FQDN and IP Address
On the following prompt enter IP Address or FQDN
Enter IP address or FQDN (IP) [current IP is 192.168.1.38]:
Note: FQDN is recommended (if IP address is entered then application will only be accessible from the IP address)
- ✅ Recommendation: Enter the FQDN (e.g., appliance.cywift.local)
- ⛔ If you enter just the IP, the web app will only be accessible via IP.
